How Ot Overlay Image In Blendre : texturing - how to combine 2 or more textures in Cycles? 2 ... : To load a metallic map, all you have to do is plug the map into an image texture node (as we did before), and plug this node into the metallic input of the principled bsdf.
How Ot Overlay Image In Blendre : texturing - how to combine 2 or more textures in Cycles? 2 ... : To load a metallic map, all you have to do is plug the map into an image texture node (as we did before), and plug this node into the metallic input of the principled bsdf.. In blender, you parent the mesh object to the armature object, then you can continue with the weighting or weight painting process (explained later). Indeed, by selecting the cube, in object > instancing. To render an image, simply select render at the top menu bar: Here we discuss the method of unfolding a mesh to create a 2d texture that fits in the 3d. This blender guide on design sync offers quick tips and tricks for moments when your stuck or need to learn something really fast to get.
In the face orientation overlay all faces where the face normal points towards the camera are colored blue. To load a metallic map, all you have to do is plug the map into an image texture node (as we did before), and plug this node into the metallic input of the principled bsdf. Hdris have become the industry standard for realistic lighting your renders in blender is a discipline in its own right. In this blender video editing tutorial we will be looking at creating an image overlay in blender 2.8. It took me a while to locate it as well.
Blender se actualiza a la 2.80 con una renovada interfaz ... from www.creativosonline.org Choosing the necessary settings for render is very crucial to making the best and most efficient art. To load a metallic map, all you have to do is plug the map into an image texture node (as we did before), and plug this node into the metallic input of the principled bsdf. Click new on the image texture. I'm using an anisotropic shader for the underlying brushed metal and have uv mapped a png (with alpha take the alpha socket from your image, and plug it in to the fac of the mix shader node. In this blender video editing tutorial we will be looking at creating an image overlay in blender 2.8. This tutorial shows how to easily add images or sketches to the background of blender's workspace. Enlarge the faces where you want more detail. Leave it on the point tab and connect its output to the vector input of the image texture (the purple one).
When i import regular obj files into blender, they come in with a basic diffuse shader applied, with the texture file in the right place.
Create the vision.alphablender object and set its properties. But for data visualization in blender, if a png image with alpha can be imported as texture, it's very helpful to take icon in blender. I'm using an anisotropic shader for the underlying brushed metal and have uv mapped a png (with alpha take the alpha socket from your image, and plug it in to the fac of the mix shader node. Sometimes you might have a model that is. The background image option is similar in that it adds an image and can be scaled, rotated, and moved with the s, r, and g keys, but it is only viewable in the top, front, or side views of. Enlarge the faces where you want more detail. Hdris have become the industry standard for realistic lighting your renders in blender is a discipline in its own right. That is why we made this article that should help the very beginners to understand what uv mapping in blender is and how to work with it. To render an image, simply select render at the top menu bar: Choosing the necessary settings for render is very crucial to making the best and most efficient art. Unfortunately, in gnome 2 and a few other window managers, this key jason van gumster, author of all previous editions of blender for dummies, has used blender in animation, video, and digital design for over 20 years. How to use blender (10 tips for complete beginners). Ctrl + p opens the parent menu.
Indeed, by selecting the cube, in object > instancing. Leave it on the point tab and connect its output to the vector input of the image texture (the purple one). This is the second part in the blender vse (video sequence editor) series which covers adding or overlaying and image. Learn how to place images over your video in blender. It covers what uv mapping is, how it works, unwrapping options and much more.
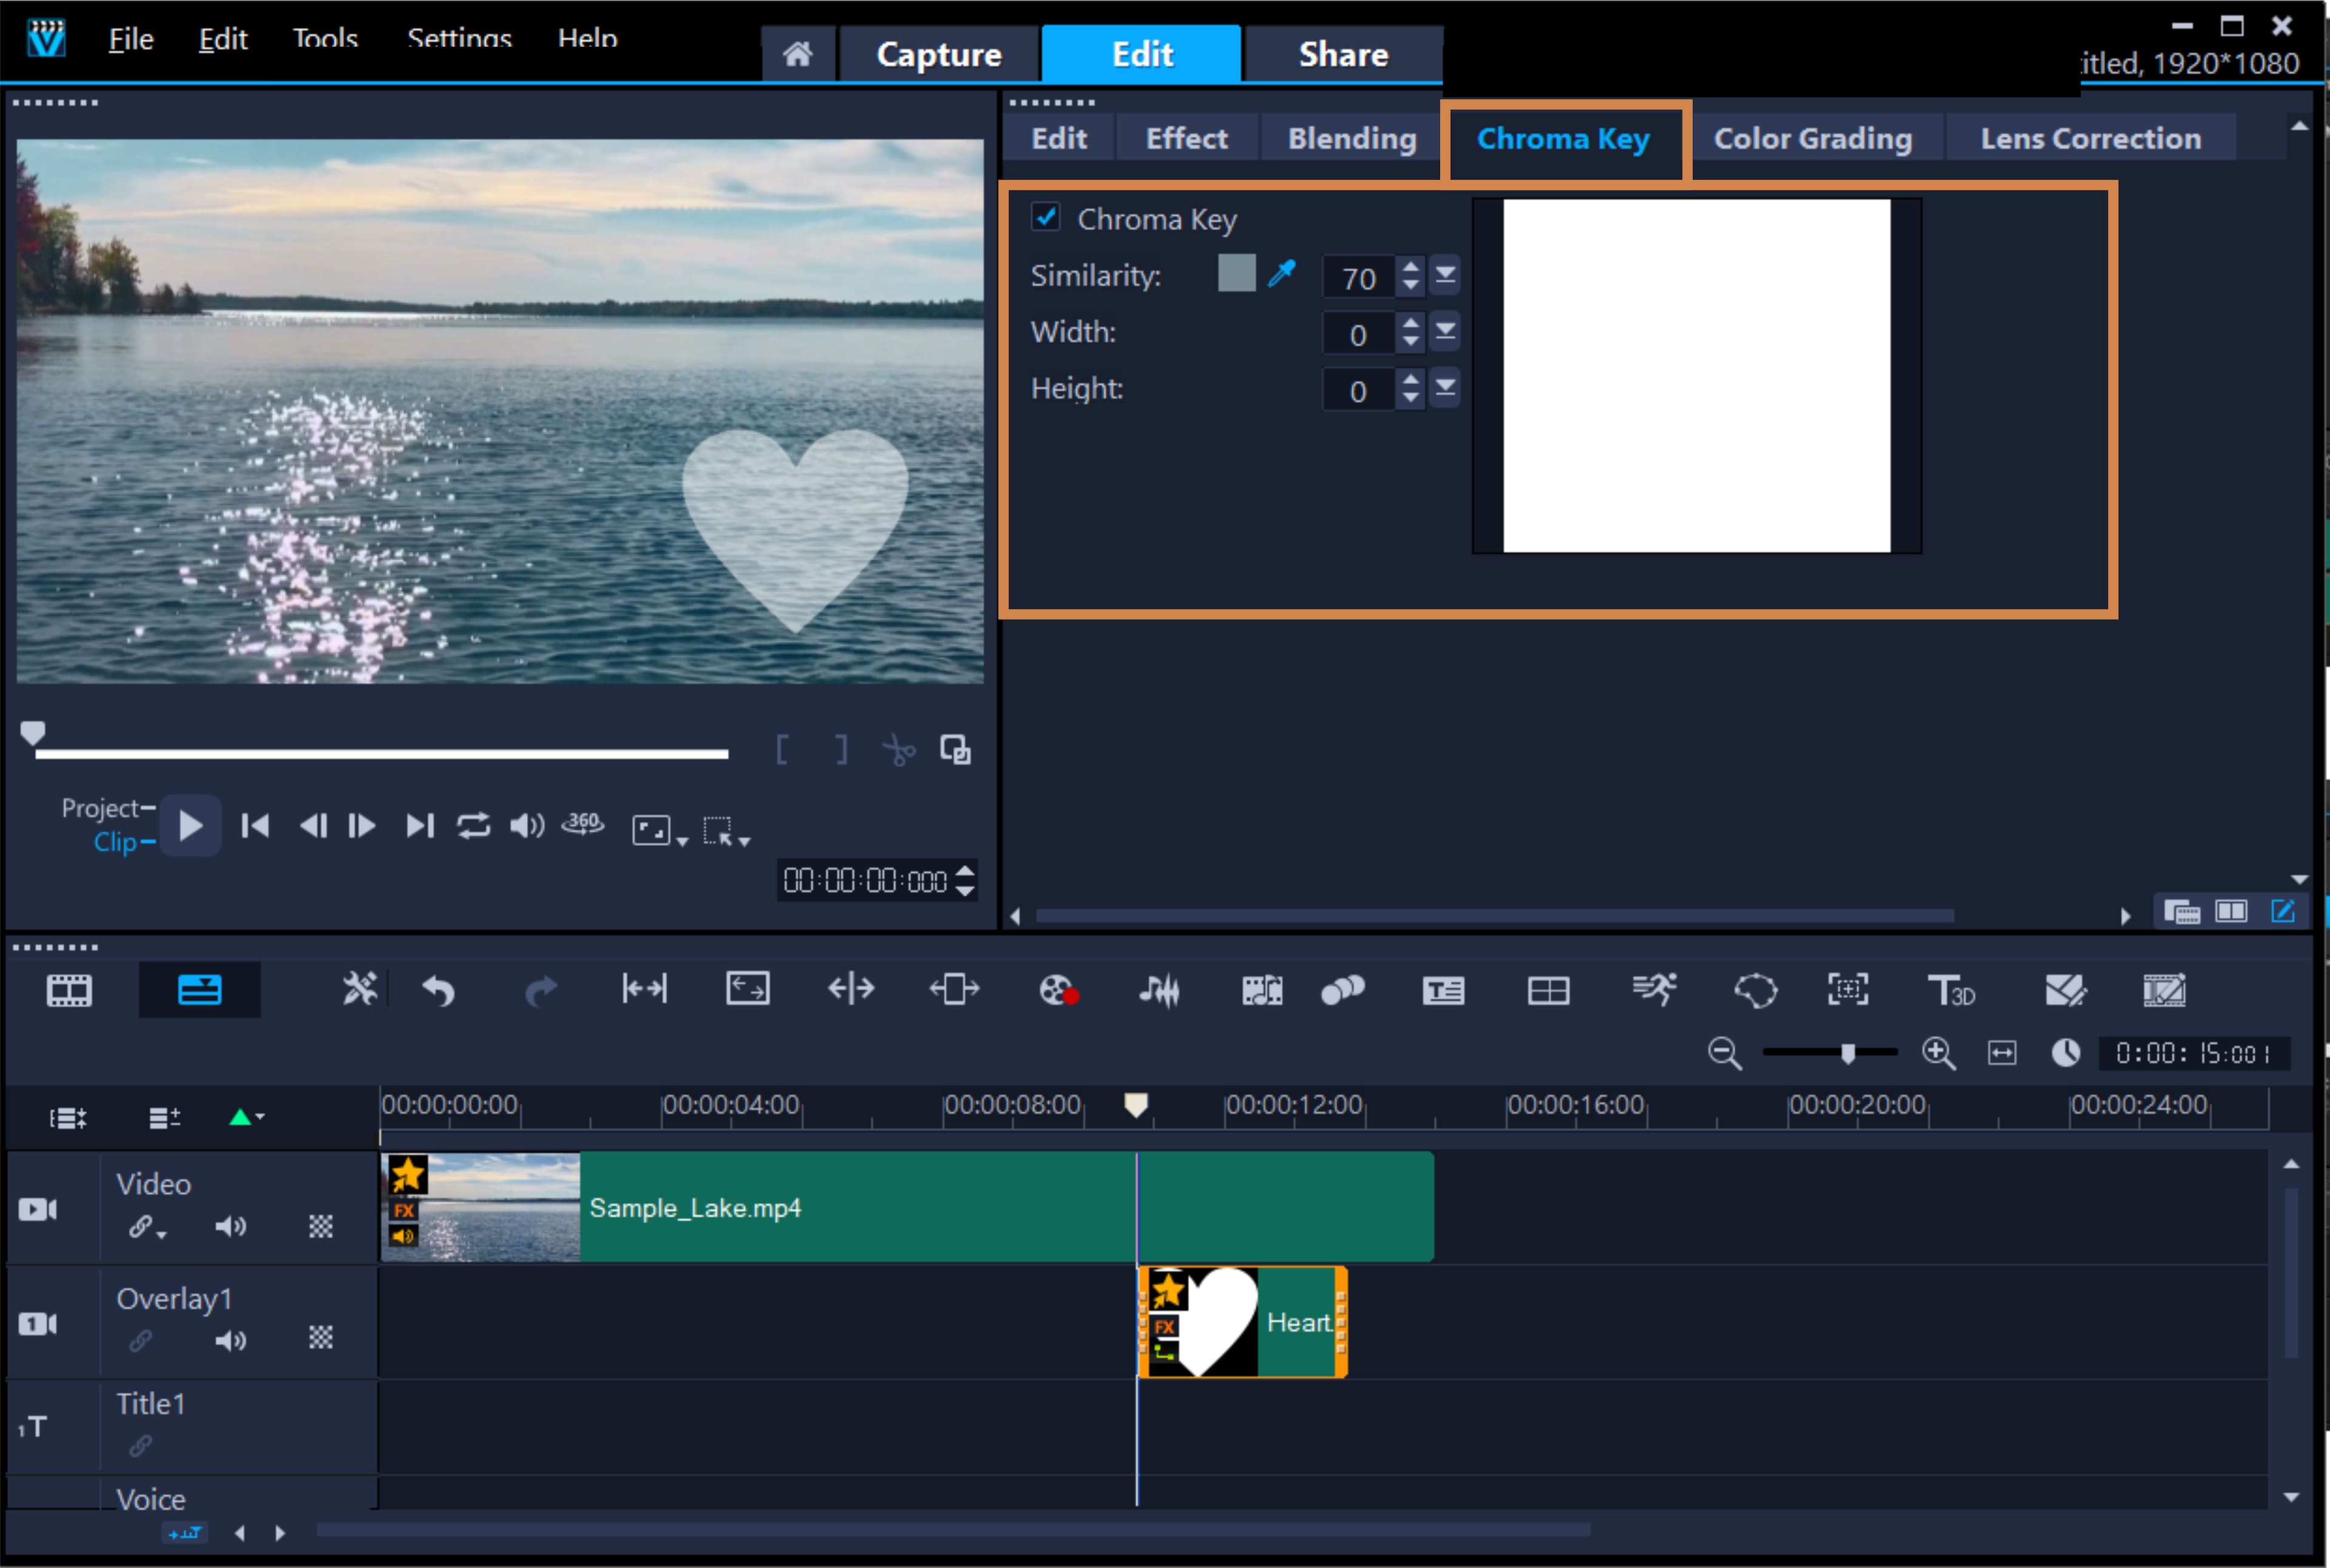
How To Overlay A Picture On A Video in VideoStudio from www.videostudiopro.com In blender 2.8 , however, we have to look for another solution because if we try to duplicate the cube with frames, we see that the command is absent; Sometimes you might have a model that is. How to quickly flatten vertices, edges or faces in blender 2.8? Any new software can be daunting to get into, especially something with although explaining every part of the interface will take more than one written article, we can distinguish some important parts in this image Continuing our border line animation, we will render out an image sequence in blender 2.81 so we can overlay it onto a background of some sort. Flattening can create subtle but vital changes to 10. Click new on the image texture. Here we discuss the method of unfolding a mesh to create a 2d texture that fits in the 3d.
It took me a while to locate it as well.
That is why we made this article that should help the very beginners to understand what uv mapping in blender is and how to work with it. To load a metallic map, all you have to do is plug the map into an image texture node (as we did before), and plug this node into the metallic input of the principled bsdf. After unwrap, you will likely need to arrange the uv maps into something that can be logically textured or painted. Ctrl + p opens the parent menu. Select children first, then select the parent last. It also demonstrates how to create and apply a shadow catcher object. Combined these techniques can be used to superimpose a 3d object onto a flat image background with a. This tutorial shows how to easily add images or sketches to the background of blender's workspace. In this blender video editing tutorial we will be looking at creating an image overlay in blender 2.8. And while cycles does a lot of the heavy lifting. How to quickly flatten vertices, edges or faces in blender 2.8? Minimize wasted space in the image. Click new on the image texture.
Your mesh should now all be in blue. This blender guide on design sync offers quick tips and tricks for moments when your stuck or need to learn something really fast to get. Minimize wasted space in the image. This tutorial shows how to easily add images or sketches to the background of blender's workspace. It took me a while to locate it as well.
How to Add Easy Grunge in Blender - YouTube from i.ytimg.com It also demonstrates how to create and apply a shadow catcher object. Minimize wasted space in the image. Choosing the necessary settings for render is very crucial to making the best and most efficient art. Leave it on the point tab and connect its output to the vector input of the image texture (the purple one). If you want to get into more complex options, try. Your goals for editing are: And while cycles does a lot of the heavy lifting. Other sculpting in blender options.
Ctrl + p opens the parent menu.
Curves within blender are normally used to create the outline of an object or trace over something e.g. When i import regular obj files into blender, they come in with a basic diffuse shader applied, with the texture file in the right place. Here we discuss the method of unfolding a mesh to create a 2d texture that fits in the 3d. Alphablend = vision.alphablender creates an alpha blender system object, alphablend, which combines two images, overlays one image over another. And while cycles does a lot of the heavy lifting. Go back to viewport overlays to switch of face orientation. Unfortunately, in gnome 2 and a few other window managers, this key jason van gumster, author of all previous editions of blender for dummies, has used blender in animation, video, and digital design for over 20 years. It also demonstrates how to create and apply a shadow catcher object. In this menu go to surface and change the colour to what you want the background of the image to look like. Create the vision.alphablender object and set its properties. In blender 2.8 , however, we have to look for another solution because if we try to duplicate the cube with frames, we see that the command is absent; It took me a while to locate it as well. Select children first, then select the parent last.
Related : How Ot Overlay Image In Blendre : texturing - how to combine 2 or more textures in Cycles? 2 ... : To load a metallic map, all you have to do is plug the map into an image texture node (as we did before), and plug this node into the metallic input of the principled bsdf..